Below is a fun craft that you can make to decorate your tree! If you’re looking for other fun crafts, check out the Easter Egg coloring pages and Valentine’s Day folk art printouts!
~Liz
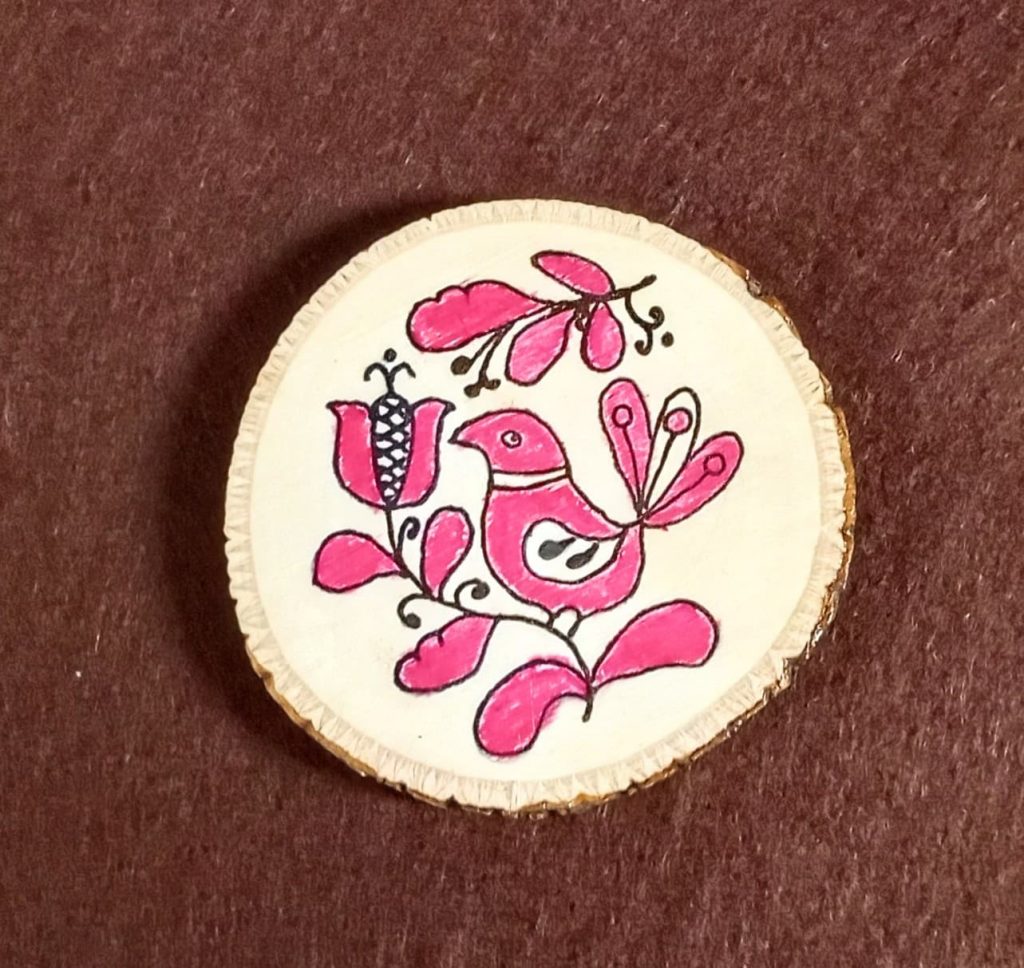
Crayon Tinted Hungarian Ornament
By Tonya Simmons
The photo is a birch slice that’s 3 1/2″ across.
Materials needed:
1 wood slice – needs to be at least ¼” larger than your design
>>Make sure your slice is aged/dried before using if you are using a locally sourced slice.
Crayola crayons – The size of the pack is your choice. Other brands do not work as well.
Print out of your design (if hand transferring)
1 piece clean paper – Copy or notebook is fine, but don’t use anything with print on it.
Graphite transfer paper – Available in most craft stores or through Amazon.
Pencil or stylus
Iron
Sharpie
Extra Materials: (not necessary, but can be used)
Acrylic paint
Acrylic or oil based paint pens
Clear Varnish – This usually found in the paint section of the craft store. Don’t use a good brush to apply the varnish. It’s tough on the bristles.
>> AVOID spray sealant. It doesn’t play well with Sharpies!
- Clean your wood slice with a clean, dry cloth.
- Trim down your design print out to fit your wood slice.
- Transfer your pattern to the wood slice with the graphite paper by placing the graphite paper down on the wood slice and your design print out on top. Trace over the design with the pencil/stylus.
>>You can also draw directly onto the wood slice with a pencil if you wish.
- Color in your design. Blow off any crayon shavings (Don’t rub!) that might have resulted from the crayon moving across the grain of the wood.
- Once finished, take your colored wood slice to your iron. Place the clean piece of paper on top of the colored area.
- Using the hottest setting, place the iron on top of the clean paper and wood slice. Count to 10 to allow the wax time to warm and wick up into the paper, leaving the colored pigment on the wood.
**At this point, if you look at your wood slice and see an area that you missed coloring or wish to make a color darker, repeat step 3-5. Just be sure to use a clean section of the copy paper each time you iron or you’ll end up with random bits of wax all over your wood slice.
- Add in outlines/details with your Sharpie/paint pens.
**If you want to decorate the other side of the wood slice, wait an hour to before doing so to allow any paint from step 6-7 to dry fully before continuing.
- If you want to add a protective sealant, apply to one side of the slice and allow it to dry completely. Then, do the other side and the edges of the slice.
And you’re done!
Tonya Simmons is a lifetime crafter who started embroidering and sewing at the age of 5 with her grandmother’s help. Now, she’s a retired world language teacher who spends her days crafting to her heart’s content. If you would like to check out some of her work, you can visit facebook.com/DosChicasCrafts .